Tension and hips go together like two peas in a pod. Active yoga poses for the hips, like lunges and the Warrior series, can certainly stretch different areas of the hips, but when it comes to releasing deeply rooted stress, sometimes the best way to work is passive. Restorative poses allow the body to be fully supported through props so that the body can open up easily without force or strength. Here are three restorative yoga poses that can help release tension in the hips:
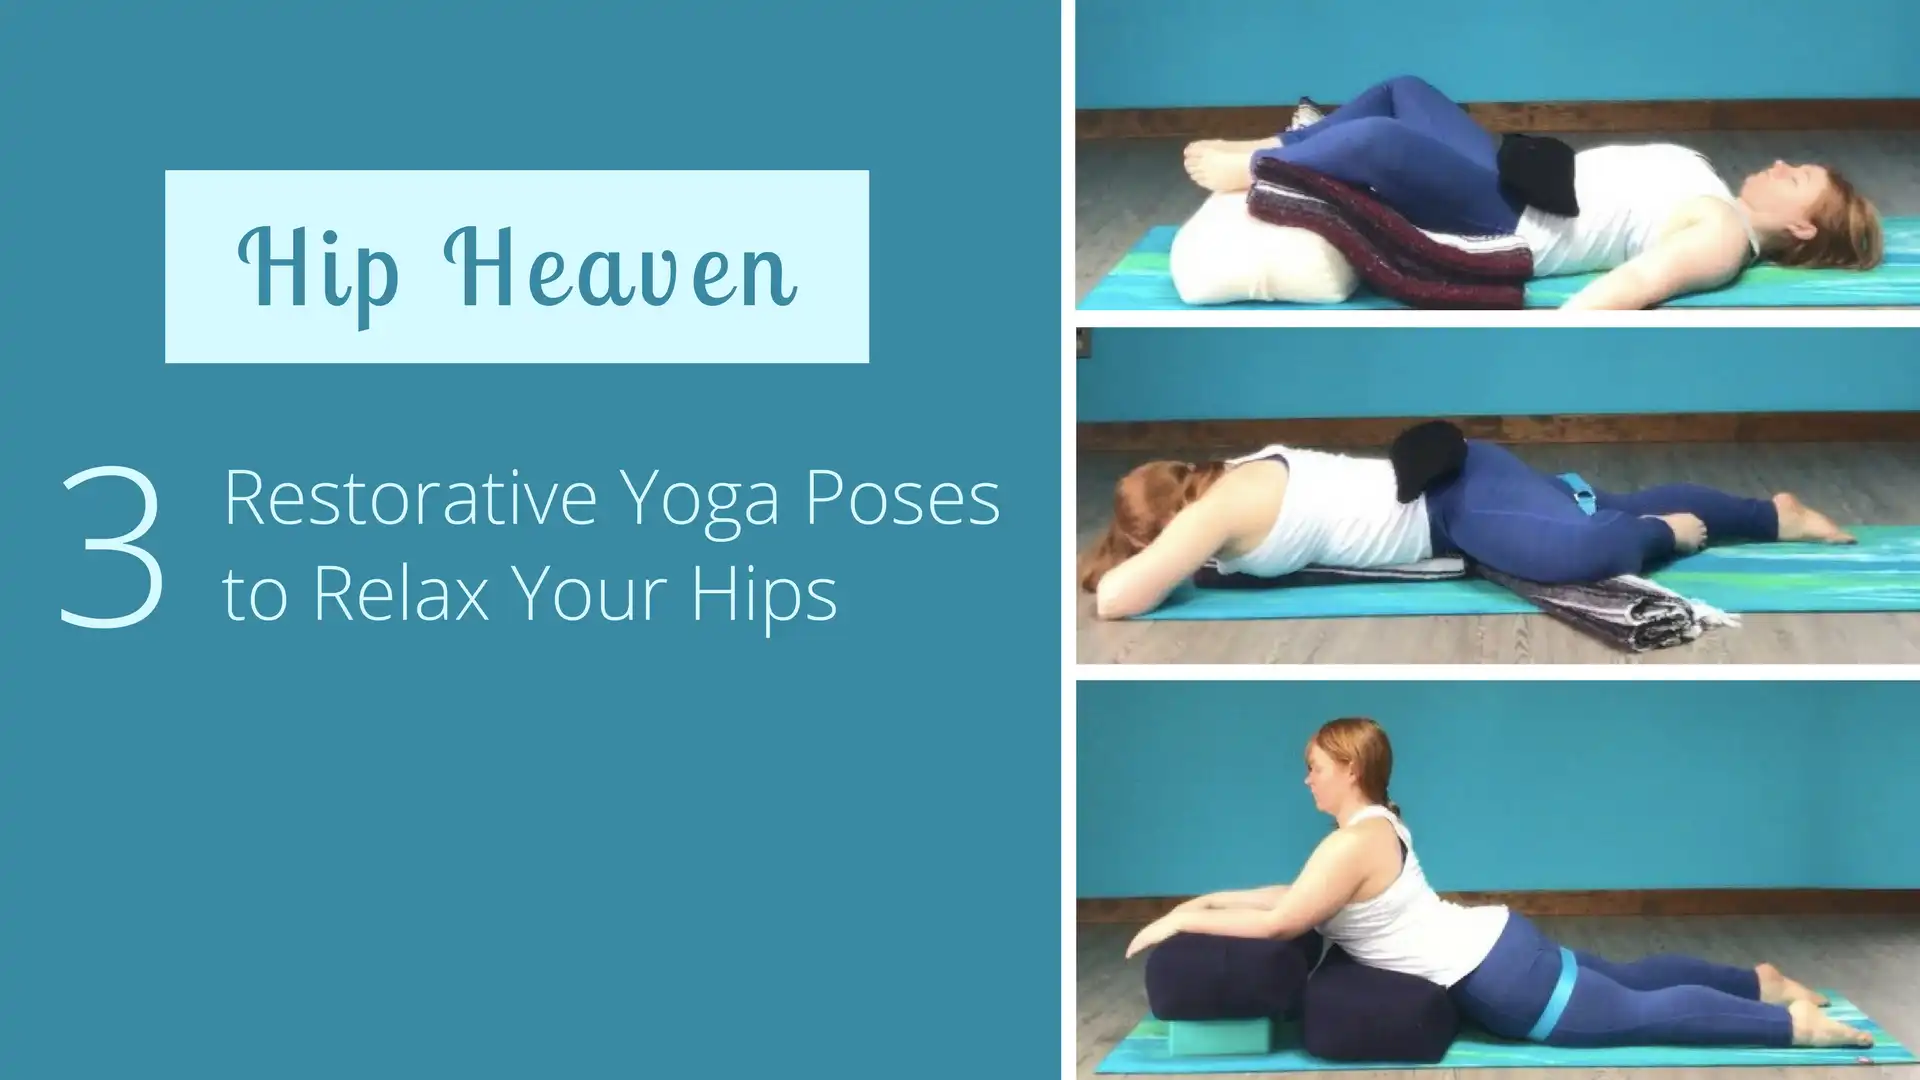
Prone or Supine Tree Pose: Gentle Yoga For the Hips

Prone Tree Pose (Vrksasana) releases the inner thigh muscles of the bent leg and relaxes the posterior hip of the straight leg. You can practice this yoga for the hips pose either on your belly or on your back. If your hips externally rotate easily, then practicing on your belly would be suitable. You can test this by lying on your back in Tree Pose. If when you lie down on your back in Tree Pose, your bent knee is less than three inches off the floor, lying on your belly to practice this pose should be okay. If your bent knee is higher than three inches off the floor, then practice on your back so that you don’t compromise your hip joint.
For this restorative pose, you will need two blankets, a strap, and an optional sandbag or eye pillow. Take your time to set up each pose.
- Fold a yoga blanket to about the length and width of a bolster (approximately 10 inches by 20-24 inches). This blanket will be placed lengthwise under your torso. Once you lie down on it, you can alter the fold to accommodate your torso. Place this blanket lengthwise at the head end of your mat.
- Fold your other blanket the same as the first, then fold it once more lengthwise so that this blanket is approximately 5-6 inches by 20-24 inches and twice as thick as the first blanket. (Have a look at the photo and this will all become clear!) This will be placed under the thigh of your bent knee. (Once you’re in the pose, you can change the fold depending on how much space there is between your thigh and the floor.) Place this blanket halfway down your mat and over to the right side.
- Grab your strap and make a snug loop around the middle of your left thigh. Make sure that the tail of the strap is facing away from your body so that as you tighten the strap, you are encouraging the thigh to rotate internally.
- Before lying down, have your sandbag nearby.
- Come onto all fours and bend your right knee toward your chest, then externally rotate the thigh (to the right).
- With your right thigh extended out to the right side, slowly lie down on your first blanket with your frontal hipbones on the blanket and the rest of the pelvis off the blanket. Rest your right thigh on your second blanket, adjusting the blanket as needed to support the entire inner thigh. Your head should be off the edge of the first blanket.
- Without tightening the strap, tug on the tail to encourage lifting your inner left thigh up away from the floor and your outer thigh moving down toward the floor.
- If you have a sandbag, place it over your sacroiliac joints.
- Rest your forehead on your forearms, or turn your head to one side and rest your arms out to the sides.
- Stay here for 5 to 7 minutes.
- To come out of the pose, wiggle the sandbag off your sacrum. Use your hands to help roll yourself to the left slowly bringing your right knee toward your chest.
- From there, make your way back onto all fours, switch your props, and repeat on the other side.
Hip Heaven: Elevated Bound Angle Pose or Easy Pose

Elevated Bound Angle Pose (Baddhakonasana) is a great restorative yoga pose for the hips because it uses gravity and the weight of your legs to passively open the front of the pelvic region. If Baddhakonasana is too intense, you can opt for extra support such as blocks or folded blankets under the thighs. You may also opt to cross your ankles and practice Easy Pose (Sukhasana) instead. In the latter option, remember to switch the cross of your ankles at the halfway point so that you stretch evenly from side to side.
For this restorative yoga for the hips Asana, you will need a bolster and two or more blankets. A sandbag and eye pillow are optional.
- Place your bolster widthwise (across the mat) at one end of your mat and fold both of your blankets into rectangles of about 20 inches by 24 inches. (For most yoga-specific blankets, you can fold them in half widthwise, and then fold them a second time widthwise to achieve the correct size.) Have your sandbag and eye pillow nearby.
- Place the soles of your feet on the bolster and test moving your legs into Baddhakonasana. If there is space between any part of your legs and the bolster, place folded blankets under them. You may notice that your support needs could be different on each side—one support might need to be folded more than the other. In this case, fold both blankets to the thicker size and place them under the thighs. That way, one leg receives the support it needs while the other leg isn’t going to its maximum; it gets to take the day off, too.
- Lie down on your mat with your legs and glutes resting on your bolster and blankets. Move the flesh of your buttocks toward the bolster.
- Place your eye pillow over your eyes and the sandbag over the front of your pelvis.
- Stay here for 5 to 25 minutes.
- To come out, remove your sandbag and rest for another minute or two. Take your hands to the outside of the knees and gather the legs together. Rest here for a few moments then roll to one side and slowly make your way up to a seated position.
Supported Sphinx Pose: Passive Hip Opening In Internal Rotation

When we think of relaxing the hips, we generally think of external rotation of the hip joints. In this restorative pose, we will open the front and the back of the hips passively in internal rotation.
You will need two bolsters (or one bolster and a stack of blankets), one strap, and two blocks to practice Supported Sphinx Pose (Salamba Bhujangasana).
- At the head end of your mat, place your two blocks flat (at their lowest height), side by side, about four inches apart from each other, with their longest edges parallel to the sides of your mat. Place your bolster widthwise (across your mat) on top of the blocks.
- Place your second bolster (or stack of blankets) a few inches away, parallel to the first bolster so that the two bolsters are stair-stepped. The first bolster should be about four inches higher than the second one.
- Loop your strap around the middle of your thighs. Your legs do not need to be all the way together. The strap helps to keep the legs in a slight internal rotation to keep the back of the pelvis spacious.
- Lie down on the lower bolster, with your frontal hipbones on the bolster and your pubic bones suspended above the ground. If you have a longer torso, you might want to place some blankets on top of your bolster to boost the height.
- Place your forearms on the second bolster so that you are in a supported Sphinx Pose. Stay here for 1-3 minutes, visualizing the front thighs releasing to gravity.
 Remove the blocks from under the first bolster and move it to about six inches or so from your second bolster, so that you can rest your chest on the second bolster and your forehead on the first bolster. Make sure that only your forehead is on the bolster so that your face is facing the floor between the two bolsters. Place the blocks under your forearms and elbows.
- Stay here for 5 to 10 minutes.
- To come out, slide your body toward your feet a little and roll to one side, supporting yourself on your second bolster. Use your hands to sit up.
- Take a 5- to 10-minute Savasana (or longer).
After your yoga for the hips practice, take a few minutes to check in with the state of your hips. Observe the front of your pelvis, your outer hips, the back of your pelvis, and your inner thighs. Notice if they feel spacious. Slowing down your practice and giving your body ample support releases tremendous tension in your hips that you may not otherwise receive from an active practice.