Restorative Shoulder Release Pose uses gravity to help relieve upper back, neck, and shoulder tension. Lying on the belly, you cross your arms and use the weight of your chin on your arms to release shoulder tension. The pose eases neck and upper back stiffness, gently stretching the spine, sacrum, and lower back.
This is an excellent pose to relieve mental fatigue and release a sense of burden or pressure/responsibility. It helps alleviate text neck and other computer-use-related tensions. It can be soothing for those who feel anxious or overwhelmed, as the soft pressure on the belly and abdomen induces a calming, grounding effect. Restorative Shoulder Release Pose is especially recommended for those with chronically tight shoulders, stiff necks, or tight upper backs.
Those with shoulder injuries (especially rotator cuff injuries), neck injuries, eye conditions, and severe back problems should avoid this pose. Trauma-sensitive practitioners should honor any safety concerns about being in a prone position.
How to Set Up Restorative Shoulder Release Pose

To set up for Restorative Shoulder Release Pose, you’ll need the following: a yoga mat, 1 bolster, 1 to 2 blocks, and 1 to 2 blankets. You can use pillows or rolled-up blankets if you don’t have a bolster.
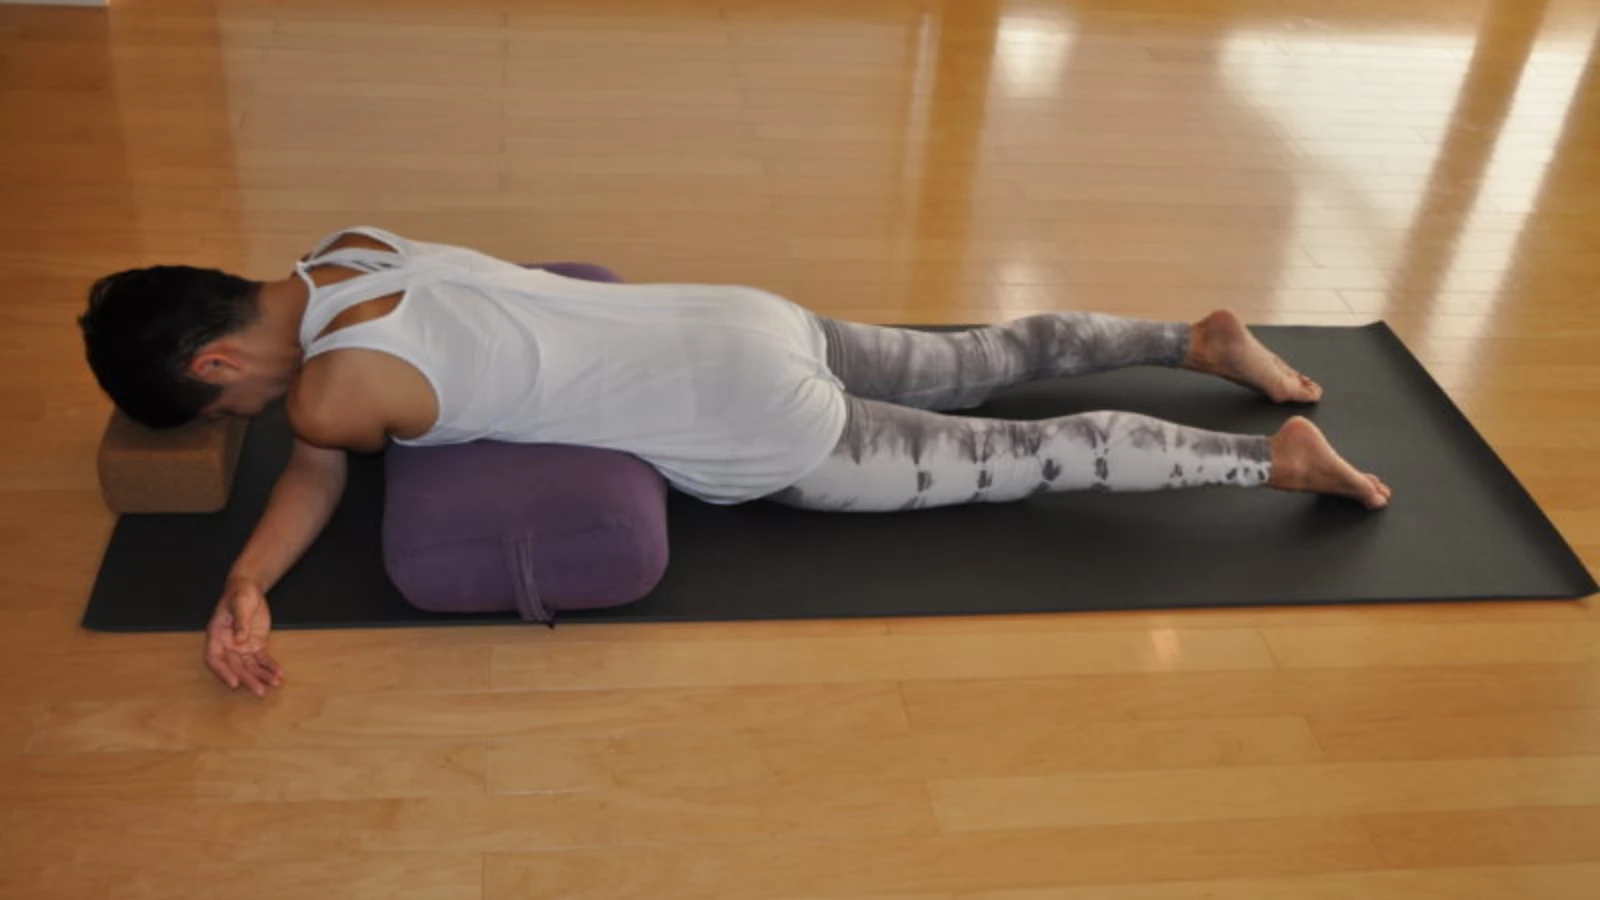
- Start by spreading a yoga mat on the floor. If you would like, cover the mat with a blanket for softness under the body.
- Place a bolster horizontally in the middle of the mat.
- Place a block, rolled-up blanket, or neck pillow at the top of the bolster to support the head, leaving enough space for your arms to fit between the bolster and the support.
How to Practice Restorative Shoulder Release Pose

- Lie belly down over the bolster to support your abdominal region and lower chest.
- Cross your left arm over your right and thread the arm all the way through as far as it can go.
- Lean forward so that your chin rests on your arms. Let the weight of your head release onto the block or blanket, keeping your neck long.
- Make sure you are evenly laid out, supported, and comfortable and that you can breathe with ease.
- Let your chin's weight rest on your arms and elongate the back of your neck. Do not try to hold your head up in any way. Allow your forehead to release onto the block and let your shoulder blades draw down toward the mat. Throughout your time in the pose, try not to let your shoulders rise toward your ears.
- Sense all the places you feel your body making contact with the props and the ground. Take several slow, deep breaths to release your weight, melting with gravity into the support.
Turn Awareness Inward
- Turn your attention inward and focus on the breath. Breathe deeply into your shoulder joints and shoulder blades. As you inhale, allow this area to expand and soften, like wings lifting up. Exhale and invite the back of your heart to release, imagining the wings dropping.
- Then bring your awareness to the entire spine. As you inhale, soften into any areas you feel need releasing—sacrum, lower back, middle back, upper back, shoulders. As you exhale, let go into the pose and melt into the support, releasing earthward.
- Notice the sensations in your body and any emotions that arise. Observe without judgment, holding them in loving awareness. You can also try releasing tension, stress, anxiety, worry, and exhaustion on the exhalation and cultivating peace, self-love, and comfort on the inhalation. As you drop into a greater sense of stillness, anchor your awareness in the sensations in your body by following the breath as it moves in and out, finding stillness as you open and expand into the pose.
How to Move Out of Restorative Shoulder Release Pose
- Stay in Restorative Shoulder Release Pose for 1 to 5 minutes, as long as there is no discomfort. When you feel ready to switch sides, gently unthread your arms and rest your cheek on the block before bending your knees and lifting yourself out, head last.
- Next, cross your right arm over your left and thread the arm all the way through as far as it can go. Then rest your chin on the arms and place your forehead on the block. Note that each side will likely feel different. Keep your neck long and shoulders relaxed. Be sure to practice Restorative Shoulder Release Pose on both sides for equal amounts of time.
- When you are finished, take your time to unthread your arms, turn onto your side, and rest the side of your head on the block, bending your knees if needed. Rest for a few moments on your side and enjoy a few quiet breaths before coming up slowly, head last.
Restorative Shoulder Release Variations
-

If your head or neck feels uncomfortable with your forehead resting on the block, you can remove the block and rest your forehead on the mat.
- Use a rolled-up blanket if a bolster is uncomfortable under your chest. Those with pacemakers or large breasts might find this variation more suitable.
- If needed, place a soft support under the arms/shoulders, such as a rolled-up blanket or neck pillow. This will lessen the effect of gravity in releasing the shoulders, but it will be more comfortable for some people with tight shoulders.