TLC for Your Knees: How to Keep Your Knees Safe in Yoga Practice

One of the most common causes of chronic pain is knee pain. According to the Centers for Disease Control and Prevention (CDC), (1) one-third of people living in the U.S. suffer from joint aching or stiffness, and the area most often affected is the knee. If you’re one of these people, you may wonder if yoga can help to alleviate your knee pain—or if it will make it worse.
Many of the poses in an asana class can help you to achieve the balance between mobility and stability that is so vital for the health of your knees. When proper alignment principles are practiced and appropriate modifications applied, asana can safely strengthen and stretch the muscles surrounding your knee joint.
Beyond the mere physical benefits of asana, the philosophical tenets of yoga can guide you toward a healthier approach to your knee pain. Ahimsa (commonly translated as nonviolence or compassion) is the very first step on the eight-limbed path of yoga delineated by Patanjali in the Yoga Sutra. While you could apply this idea of being kind and doing no harm toward other people in your life, you can also apply it to how you treat yourself and your own body, particularly during asana practice. Being mindful of sensations in your body and learning to distinguish between safe levels of discomfort and unsafe levels of pain are intrinsic lessons of ahimsa.
Alignment
The following are general rules of alignment for the knees. However, keep in mind that every body is different. If following these rules does not feel right in your body, acknowledge that; then experiment in order to find the alignment that does not create pain in your knees.
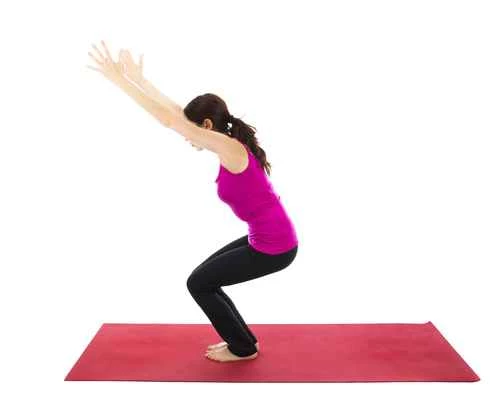
1. In standing poses, the knees track over the second and third toes. This goes for poses where the legs are straight, such as Tadasana (Mountain Pose), or bent, such as Utkatasana (Fierce Pose).
2. In standing poses where one knee is bent, such as Virabhadrasana I and II (Warrior 1 and 2), the bent knee is stacked above the ankle joint.
3. In poses where one or both legs are straight, micro-bend the knee to avoid locking the knee joint. A micro-bend engages the muscles that surround the knee, recruiting the quadriceps, hamstrings, and calf to stabilize the joint.
To find just the right amount of bend, engage your hamstrings (along the back of your upper leg) as if you’re trying to bend your leg a little bit. Then pull your kneecap up by contracting your quadriceps (on the front of your thigh) to keep the leg relatively straight.
4. In poses where the knee is bent and externally rotated, such as Agnistambhasana (Ankle-to-Knee Pose) or Reclining Pigeon, flex your foot. The resulting engagement of the muscles along your lower leg will help to protect your knee joint.
Strengthening
When yoga teachers talk about strengthening the knees, what they really mean is strengthening the muscles that surround the knee joint—the hips, quadriceps, hamstrings, and calves. Strength in these muscles helps to stabilize the knee.
1. If you’re looking for just one pose to strengthen your knees, look no further than Utkatasana. Although commonly translated as “Chair Pose,” the literal translation is “Fierce Pose.” Spend even a little bit of  time in it and you’ll understand why. You’ll hear your hips, thighs, and calves talking to you—they might even begin to tremble and shake. This can be uncomfortable and physically and mentally challenging; but the good news is you’re building tremendous strength in these muscles, which enables them to properly support your knees.
-
Stand in Tadasana, feet hip distance apart and parallel.
-
Bring your hands to your hips and bend your knees, moving the hips back and down as if you’re going to sit on a chair.
-
Peek down at your knees: if you can’t see the tips of your toes in front of your knees, pull your hips farther back until you can.
-
Make sure your knees are tracking over the second and third toes of each foot. Then shift your gaze forward, bringing your head in line with your spine.
-
Maintain a neutral spine and hug your navel towards your lower back.
-
Either keep your hands on your hips or stretch your arms above your head, palms facing one another.
-
Stay for five breaths; then straighten your legs, lower your arms, and return to Tadasana.
2. Setu Bandha Sarvangasana (Bridge Pose) strengthens your gluteal muscles (buttocks) and hamstrings. 
-
Lie on your back with knees bent, ankles below knees, feet parallel and about hip distance apart.
-
With your arms along your sides, press down with the arms and feet simultaneously. Engage your abdominals as you lift your hips and roll up through your spine. Keep your thighs parallel to one another.
-
As you breathe here, isometrically (without actually moving) drag your heels back towards your shoulders to engage your hamstrings.
-
Your gluteal muscles will work to lift your hips towards the sky. See if you can engage the glutes just enough to keep the pelvis elevated without clenching or hardening them.
-
Stay for five to ten breaths; then slowly roll down through your spine, placing one vertebra down at a time.
Stretching
As always in asana, the key to healthy knees is a balance between stability and mobility. Once you’ve developed strength in your knee-stabilizing muscles, you must balance that with an appropriate amount of flexibility. The following sequence stretches the quadriceps, hamstrings, calves, and hips.
1. This variation of Utthan Pristhasana (Lizard Pose) stretches the quadriceps and hip flexors.
-
Come onto your hands and knees, facing down. If your knees are sensitive, place a blanket underneath them.
-
Step your right foot to the outside of your right hand and slide your left knee back so your weight is resting on the top of the thigh rather than the kneecap.
-
Draw your pelvis forward and down to open the muscles along the front of your left hip (the hip flexors).
-
With your left hand on the floor or a block, bring your right hand on top of your right thigh and turn to look over your right shoulder towards your left foot.
-
You might already feel an intense stretch in the left quadriceps along the front of the thigh. If you’d like a deeper stretch, bend your left knee and hold onto the outside edge of your left foot with your right hand.
-
Continue to release the front of your left hip towards the ground as you gradually pull your left heel towards your left buttock.
-
Stay for five to ten breaths; then gently release your left foot back to the ground.
-
Unwind, face forward, and come back to hands and knees to repeat to the other side.
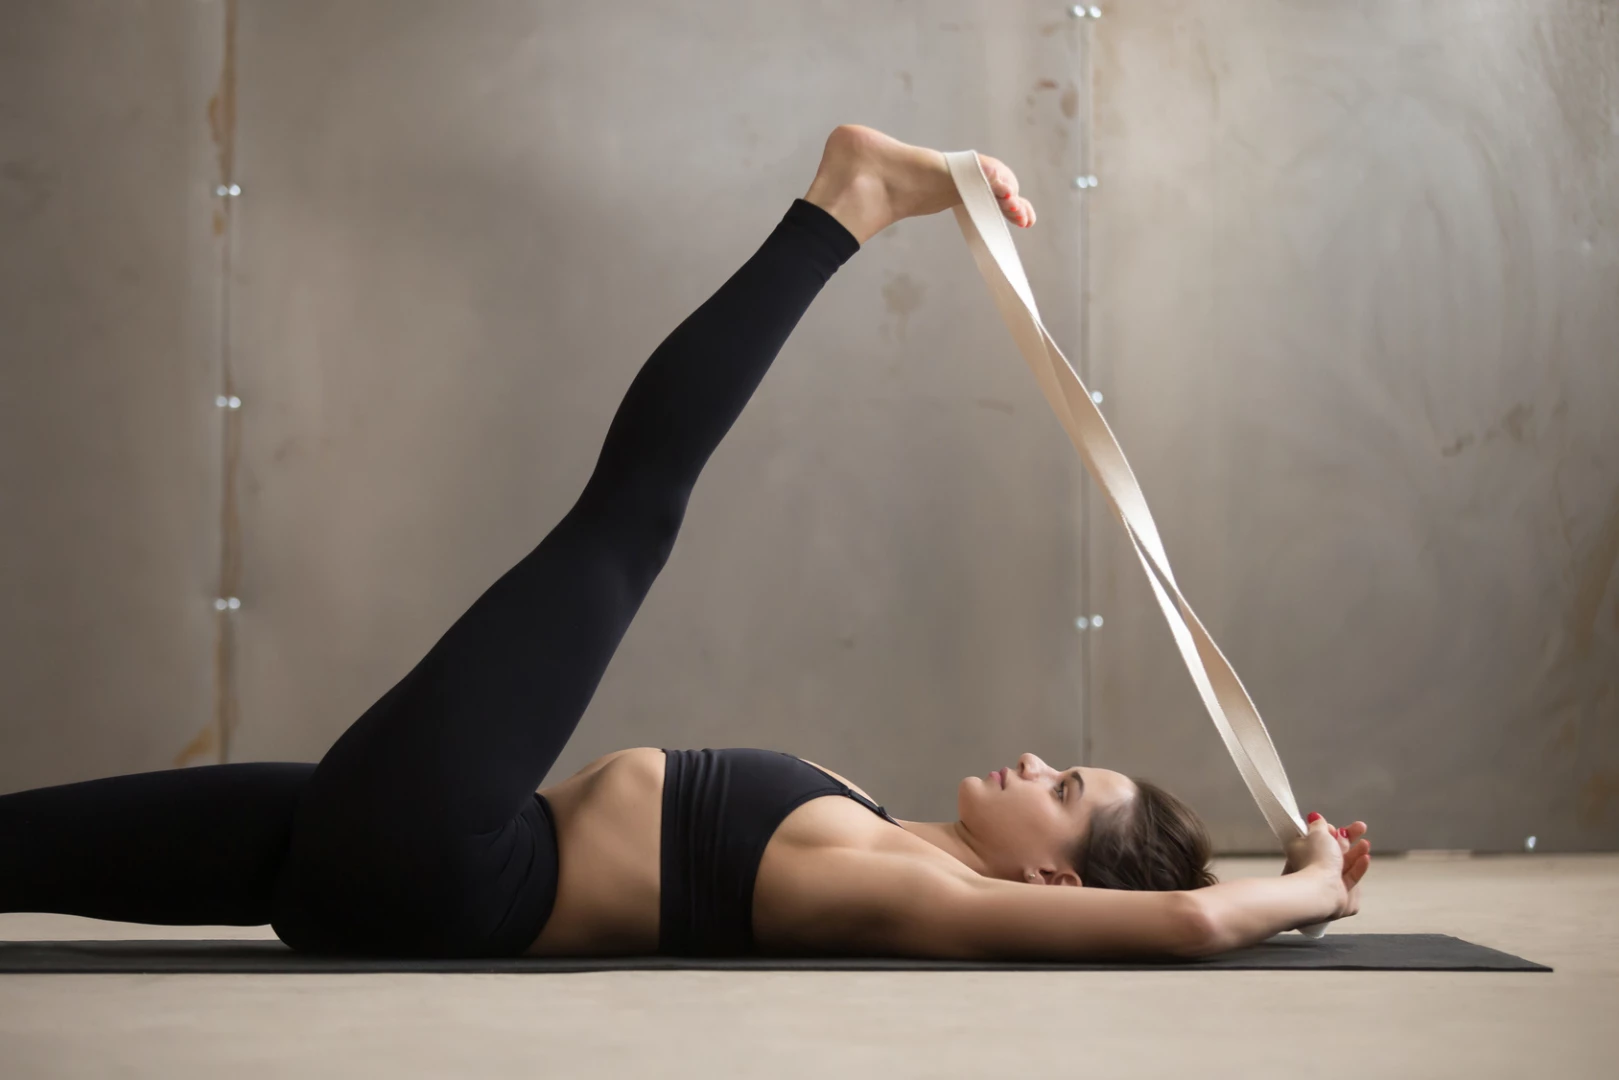
2. Supta Padangustasana I and III (Reclining Hand-to-Big-Toe Pose 1 and 3) stretch your hamstrings, calves, and outer hips. 
-
Lie on your back with knees bent, soles of feet on the floor.
-
Draw your right knee towards your chest, flex the foot, and loop a strap around the ball of the foot.
-
Holding onto one end of the strap in each hand, stretch your right leg towards the sky. Either keep the left leg bent or straighten it and flex the foot as you ground down through the back of the leg.
-
Release the backs of your shoulders down towards the mat, so your chest feels spacious and your neck muscles relax.
-
Notice if one side of your sacrum is pressing down more than the other. If so, spread your weight evenly through the right and left halves of the back of your pelvis.
-
To create a deeper stretch for the hamstrings, bend your elbows slowly to draw your leg closer to your chest. To create a deeper stretch for the calf, pull the strap gently down on the ball of the foot, moving your toes closer to your shin.
-
Stay for five to ten breaths.
-
Take both sides of the strap into your left hand and release your right arm to the floor to your right.
-
Anchor your right hip to the floor and commit to keeping that hip down as your right leg travels across your body to the left. Only take the leg as far over as you can keep your right hip down and maintain that sense of even weight pressing down through both sides of the back of the pelvis.
-
Stay for five to ten breaths.
-
Now allow your right hip to lift away from the floor and roll toward your outer left hip as you move your right leg farther across your body, pausing when the leg is parallel to the floor.
-
Press the outside of your left leg into the ground.
-
Activate your right leg and hip by pressing the ball of the foot into the strap, then drawing your outer right hip in the opposite direction.
-
Stay five to ten breaths; then roll to your back, release your foot from the strap, and repeat on the other side.
Modifying
1. If you feel an ache in your knees in standing poses where one or both knees are bent, try bending a little less. Only bend the knee to the point where you experience no pain in the joint.
2. It can sometimes be painful to have the knee directly on the ground, as in Tabletop or Anjanayasana (Crescent Lunge). Placing a folded blanket under the knee helps to alleviate this discomfort by creating a cushion for the joint.
3. If you experience discomfort in your knees when sitting on your heels, as in Vajrasana (Thunderbolt Pose) or Balasana (Child’s Pose), lay a blanket or two between your calves and thighs. This lessens the amount of bend required of the knee, placing less strain on the joint.
Interested in more on knee safety? Read Olga Kabel’s The Knee Joint – Much More than a Simple Hinge – and Why it Matters.

Want to learn more about yoga and healthy aging? Study with YogaUOnline and Dr. Loren Fishman and Ellen Saltonstall – Yoga for Arthritis Prevention: Healthy Hips.

Christine Malossi, RYT 200 is based in New York City, where she offers a mindful, alignment-focused Vinyasa practice that cultivates balance, awareness, and equanimity. In addition to teaching private clients and group classes at studios throughout Manhattan, she also teaches at the Spencer Cox Center for Health at Mount Sinai Hospital’s Institute for Advanced Medicine where she designs a practice specifically tailored to patients diagnosed with HIV and other chronic illnesses. Christine is honored to be teaching yoga and to have the opportunity to pass on to others the joy and freedom that she has found in her own practice. Find her at www.christinemalossi.com
Sources
(1.) https://www.cdc.gov/mmwr/preview/mmwrhtml/mm5717a9.htm


