Plank Pose (Phalakasana, as it is sometimes called in modern times) often shows up in our practice as a brief way station between other poses, such as between Downward-Facing Dog (Adho Mukha Svanasana) and Four-Limbed Staff Pose (Chaturanga Dandasana). However, more and more, I am turning to it as a held pose for the benefits it can confer on its own: improved overall body strength, more specifically shoulder girdle strength and stability, abdominal/core and arm strength, and even leg strength, too! It can challenge awareness of overall stability vs. when fatigue begins to arise. It is a great pose to cultivate equanimity and calm in the storm of the physical demands of the pose.
Benefits of Plank Pose
I prescribe this yoga pose for:
- Improving upper body strength
- Improving core/abdominal strength
- Improving spinal stability
- Building forearm, wrist, and hand strength
- Building bone strength, especially in the wrists, for those with osteoporosis
- Improving mental focus
- Building confidence
Cautions for Plank Pose
My number one caution is to start out gradually with shorter holds and slowly add more time to your pose so your body can acclimate to the challenges of the pose. You can build endurance and stability gradually. In addition, since the classic version places a lot of pressure on your wrists, those with wrist issues such as carpal tunnel syndrome or thumb arthritis should try the modified versions, especially the forearm version. In addition, since this pose challenges and strengthens the abdominal muscles, those with abdominal hernias or women with diastasis recti (separation of the abdominal wall) should be cautious to start with short holds and see if the areas of concern do okay before proceeding further.
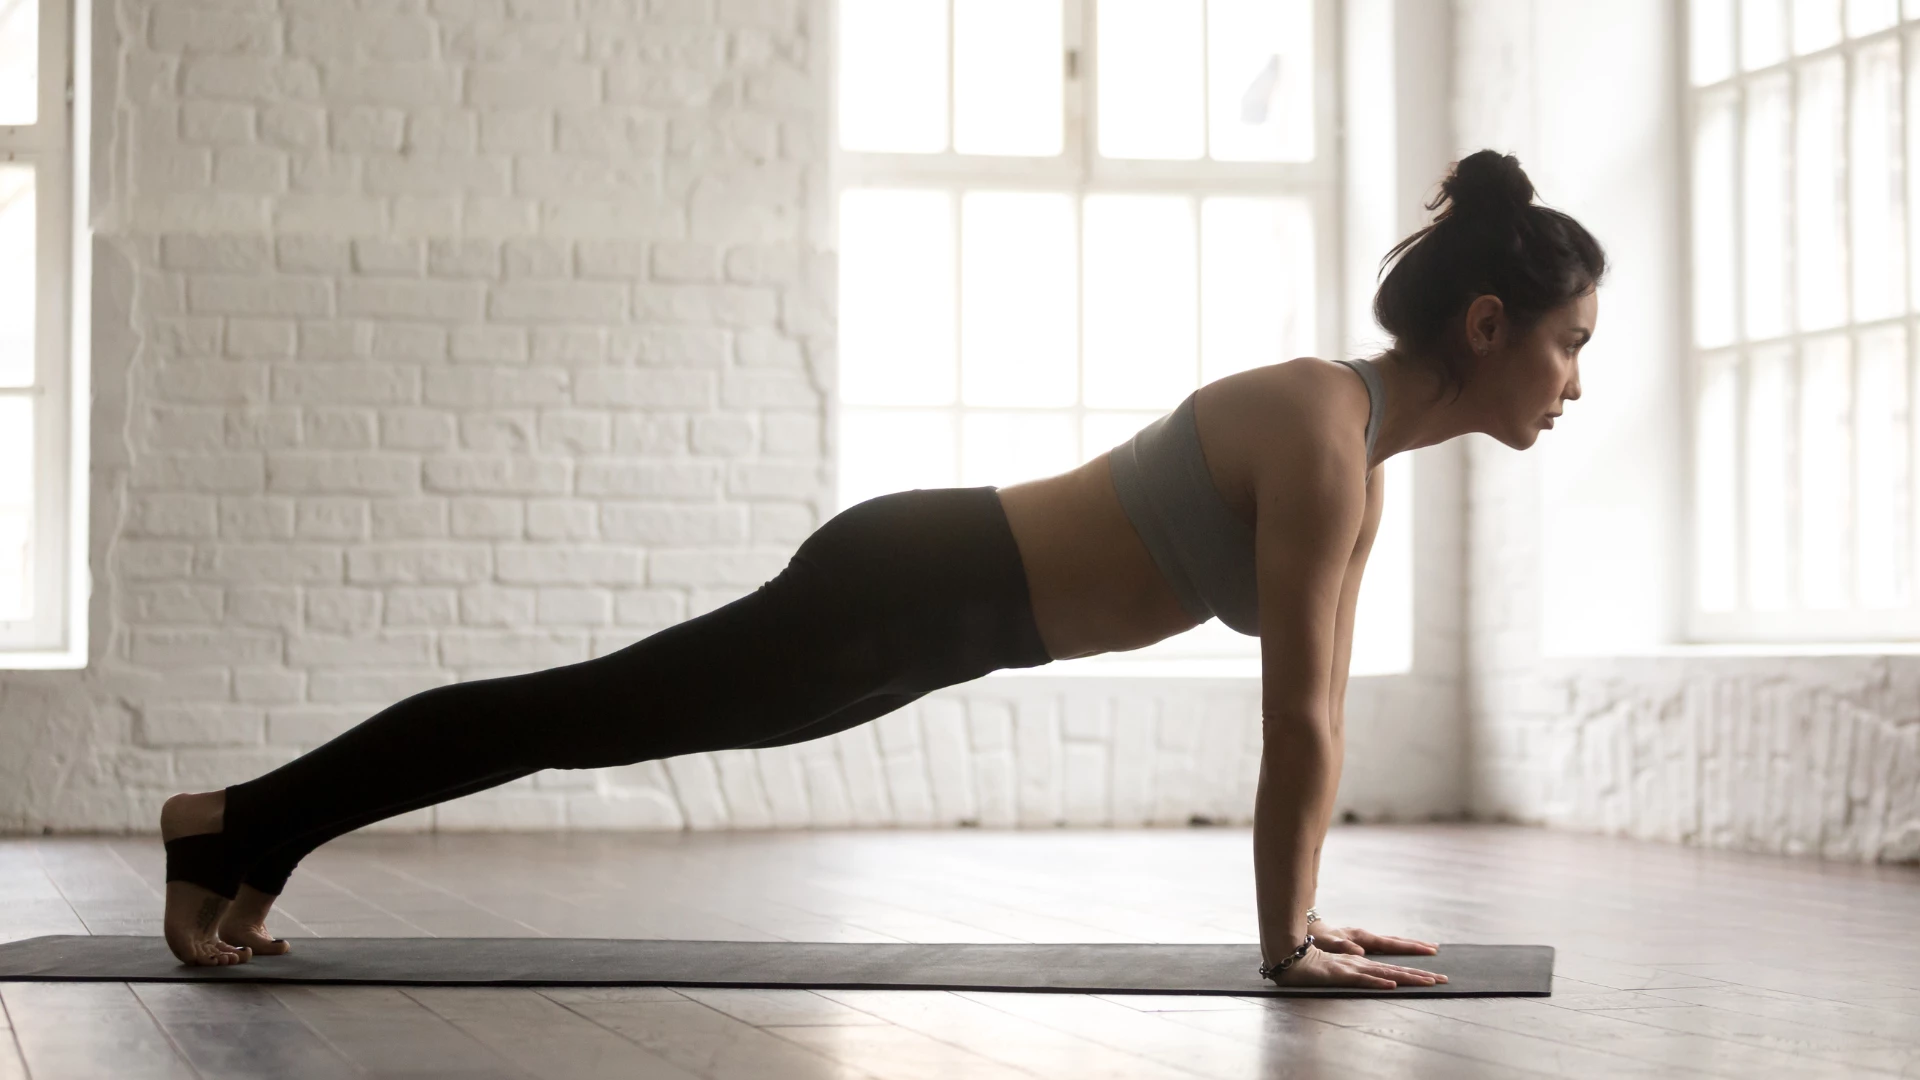
1. Plank Pose: Classic Version

You can enter into the pose from a hands-and-knee position like the one we take for Cat/Cow, but I prefer entering from Downward-Facing Dog. So, start by coming into Downward-Facing Dog, and then swing your body forward, bringing your shoulders directly over your wrist joints. Keep your head in line with the rest of your spine.
Once you have your shoulders positioned correctly, draw a mental line from your shoulders to your heels and notice if your hips are higher than that line. If so, wiggle the balls of your feet back a few inches until you sense the hips now in line. If the opposite situation happens and your hips are sagging below the imaginary line, float them up a few inches or move the balls of the feet forward a few inches to bring your hips into line.
As you work in the yoga pose, a few internal actions will help you to maintain your alignment, especially firming your elbow joints and imagining an inner lift coming up from the wrists to the shoulders. Also, lift your chest up into your shoulder blades to stabilize your shoulder region (your shoulder girdle). Finally, although most of the work will seem to be coming from the arms and chest, consider firming and lifting your belly up towards your spine without flattening your lower back. Firm your leg muscles, especially around your knees. (I will sometimes practice with a block between my thighs to recruit the help of my inner thigh muscles, and then try activating without the block, and it makes the pose easier for me to do.)
Start with shorter holds, say, four to six breaths, and gradually add longer holds over time. To come out of the pose, you can swing back to Downward-Facing Dog or simply bring your knees down to the floor. Once there, try releasing your wrists one at a time with simple circling actions. You might repeat the pose several times during a home yoga practice.
2. Plank Pose: Forearm Version

This version is helpful for those who have any wrist or hand problems and are unable to do the full version safely. In addition, most yoga practitioners feel that this version requires even more upper body and abdominal strength, so it might be the next version to practice if the classic version gets easy.
To come into the pose, start in a hands-and-knees position.
Now bring your forearms down to the floor with your elbows where your wrists were positioned a moment ago. Have your forearms parallel to each other and your palms turned down. Next, turn your toes under and lift your knees off the floor, pulling your hips up and back into Forearm Dog. As with the classic version, swing your body forward, this time directly over your elbows. In all likelihood, you will need to wiggle the balls of your feet back two to six inches until your hips come in line with your shoulders and heels. Keep your head in line with the rest of your spine. Press your entire forearms into the floor, like a big hand, so your weight does not all drop heavily into just your elbow joints.
Time your holds as in the classic version. To come out of the pose, swing back to Forearm Dog, drop down onto your knees, and release into Child’s Pose (Balasana), with your arms either straight in front of you or resting alongside your body. Release your wrists with some small circular movements. Repeat one or two more times.
3. Plank Pose: Chair Version

Because the angle of your body relative to the ground is higher when you use a chair, this version is easier and requires less initial strength than the first two versions. So this version is a good one for beginners and those who are starting off more deconditioned. This version also does not require you to bend your wrists so deeply, so it could be approachable for those with some wrist issues.
Start by placing the back of the chair against a wall so it does not slide away during the pose. Next, stand in Mountain Pose (Tadasana) about a foot away from the chair. Bend your knees, tip forward from your hips, and place your hands flat on the seat of the chair, close to the front edge. Press down firmly and walk your feet and hips back into a Downward-Facing Dog pose with hands on the chair seat for a breath or so. From here, with straight arms, swing your body forward until your shoulders are just a few inches back of your wrists and your body forms a straight line from heels through hips to shoulders. Keep your head in line with the rest of the spine.
Use the same timing as the classic version. To come out of the pose, swing your hips back to Downward-Facing Dog with hands on the chair seat, then bend your knees and walk forward towards the chair, eventually rising back up to Mountain Pose. Release your wrists with some small circular movements. Repeat one or two times.
4. Plank Pose: Knees Down Version

Because this version is between the chair and classic versions in difficulty, it is a good transition from one to the other. It is also a good substitute for Upward-Facing Dog Pose (Urdva Mukha Svanasana) or Cobra (Bhujangasana) during Sun Salutations if you want a beneficial alternative.
If you know you’ll need padding for your knees, start by placing a folded blanket in the middle of your mat. Then come in the classic version as instructed above just for a moment. Now bend your knees and drop them down to the floor or blanket. With your knees touching, lift your shinbones up towards the ceiling and bring your hips in line with your knees and shoulders, maintaining a shoulders-over-the-wrists alignment. This may require moving your hands forward or back a few inches, but do this movement lightly to keep the impact on the wrists to a minimum.
Use the same timing as the classic version. To come out of the pose, simply push yourself back to Child's Pose. Then, release your wrists with some small circular movements. Repeat one to two more times.
Article photos courtesy of Melina Meza.
Printed with permission from YogaForHealthyAging.com and Baxter Bell.com.
 Baxter Bell, MD, is a yoga teacher, educator, physician, and medical acupuncturist. These days he focuses on teaching yoga full time, both to ordinary students of all ages and physical conditions, and to the next generation of yoga teachers, to whom he teaches anatomy and yoga therapy along with his accessible, skillful style of yoga. Baxter brings a unique perspective to his teaching, combining his understanding of anatomy and medicine with his skill at instructing people from all walks of life and all levels of ability. Baxter is the co-founder and writer for the popular Yoga for Healthy Aging blog, where he shares his knowledge of medical conditions, anatomy, and yoga with practitioners and teachers across the world. In addition to being a frequent presenter at Yoga Journal Alive events and yoga conferences such as IAYT’s SYTAR, he is often quoted as an expert on yoga and health by major national news outlets such as The Washington Post and Wall Street Journal. To learn more, visit www.baxterbell.com, www.yogaforhealthyaging.blogspot.com, and his YouTube channel, Baxter Bell Yoga.