One of my most influential teachers, Aadil Palkhivala, once said, “Practicing yoga without including an inversion is like trying to make lemonade without lemons.” For those students who have mastered some version of Shoulderstand and/or Sirsasana (Headstand Pose) as a part of their home practice, his statement makes perfect sense. If you are a student who is still hoping to make friends with Shoulderstand, the approach I offer here may help.
Throughout my years of teaching, I have successfully introduced students with a wide variety of physical conditions to the following version of Shoulderstand. Whether you lack confidence in your ability to hold yourself up without falling, have a neck fusion, an autoimmune challenge such as multiple sclerosis, are recovering from an illness, or simply need support to balance an overly stressful day, this pose can work for you.
Benefits of Supported Shoulderstand
Sarvangasana is called “the mother” of all asana. This one pose alone promises to balance all glandular functions, improve circulation, lower blood pressure*, release endorphins, improve mood, balance thyroid function, reduce histamine responses, and restore immunity, to name a few.
Body Trivia
Did you know that it takes three minutes for an individual blood cell to travel through every vessel in the body? This implies that remaining inverted for three minutes or more will allow Shoulderstand to deliver its magic, i.e., flush, purify and restore all glandular and organ functions.
Timing Your Shoulderstand
I recommend building up to holding this position for a minimum of 7 minutes. If 7 minutes feels too rigorous, try holding only 3 minutes, and then slowly take your feet over your head and into Halasana (Plow Pose) with your feet on the second chair (see the photo below). Or bend your knees, and place your feet on the chair back in Baddha Konasana (Bound Angle Pose). You may also set a timer for longer holds of 7, 10, or 20 minutes.
How to Practice Supported Shoulderstand
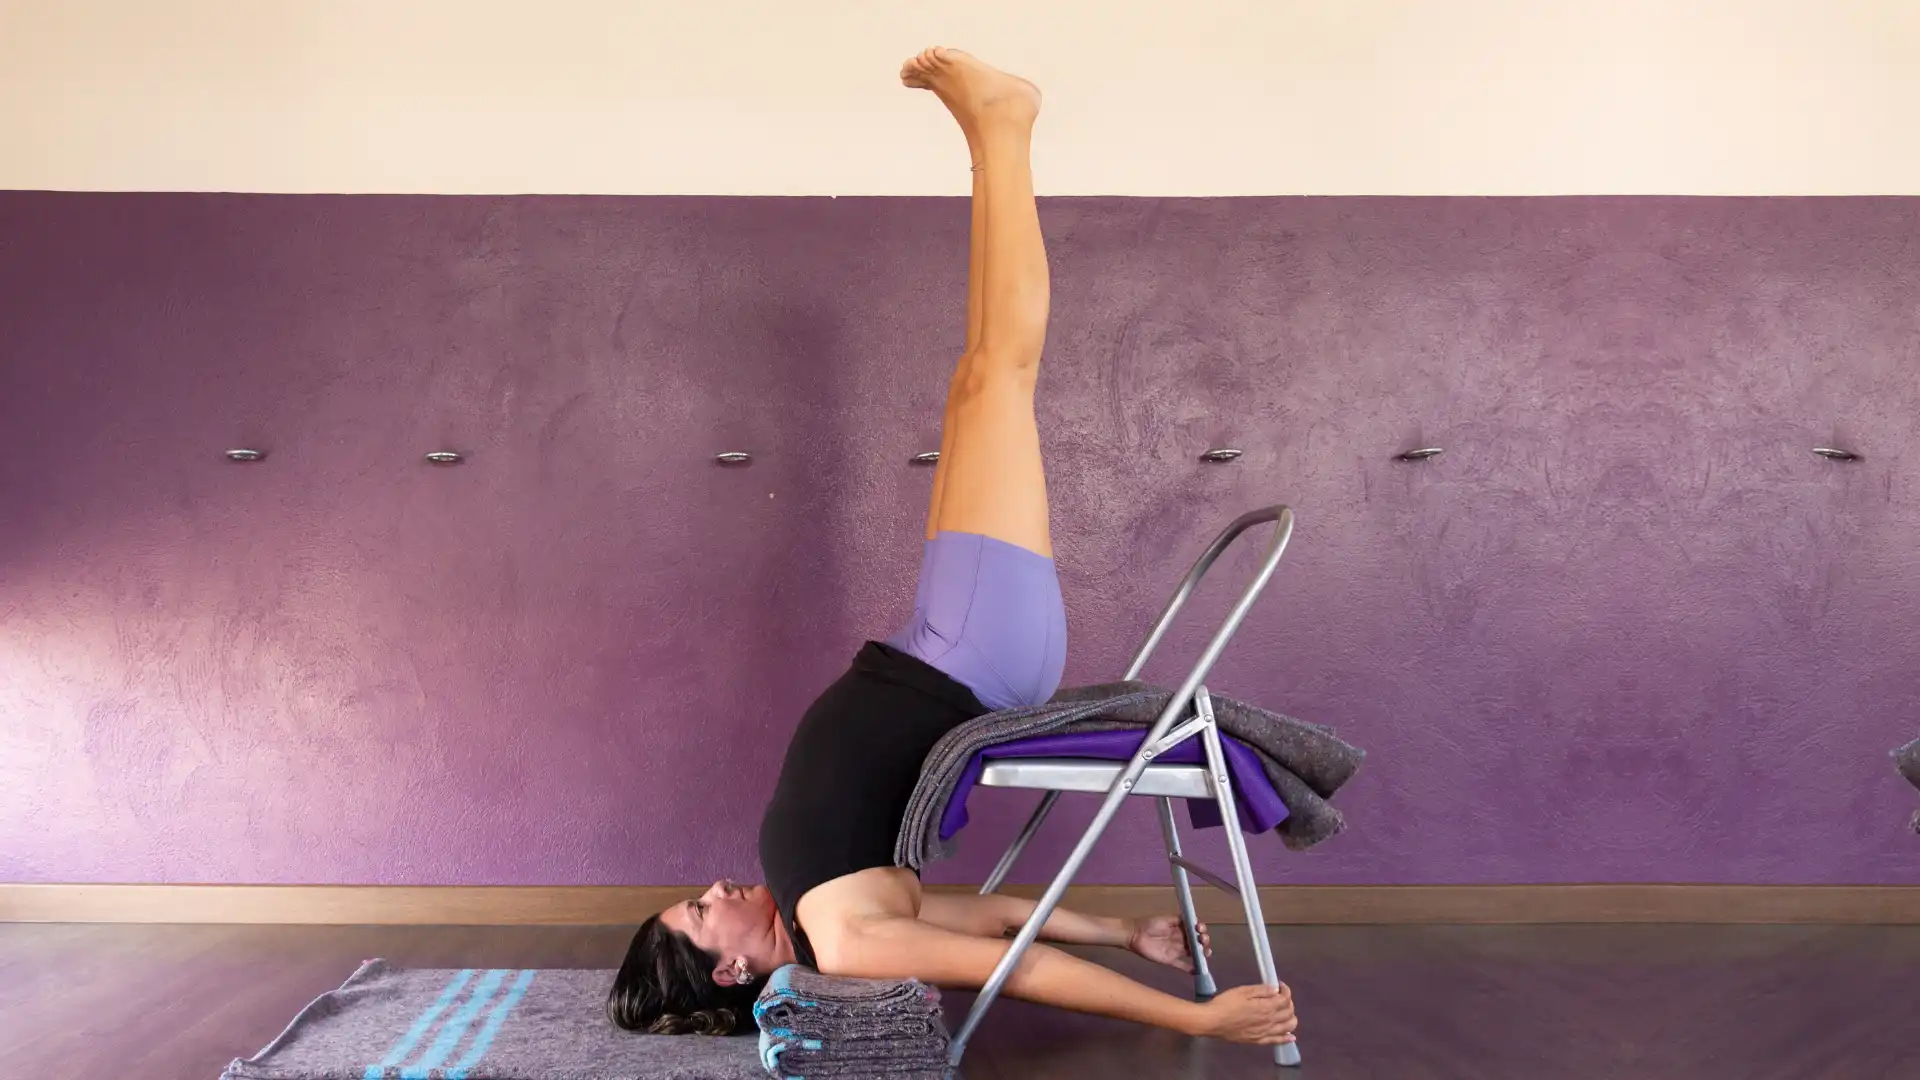
You will need two folding chairs or chairs without arms, a firm bolster, or a stack of two to three folded blankets to create a bolster, a sticky mat under the chairs to keep everything in place, and one more blanket or second mat to pad the seat of the chair.
- Sit sideways in the chair, turn, and place your knees over the chair back. Slide your buttocks into the center of the seat. Holding with your knees, begin to tip back, walking your hands down the front legs of the chair. Do not place your hands on the floor. This will encourage the chair to tip.
 on a chair in the Iyengar Yoga method.") Place your elbows on the bolster, then your shoulders. Slip your hands under the chair seat and take hold of the back legs, then place your feet on the top of the chair back. Take a moment to adjust your position.
Place your elbows on the bolster, then your shoulders. Slip your hands under the chair seat and take hold of the back legs, then place your feet on the top of the chair back. Take a moment to adjust your position. on a chair in the Iyengar Yoga method.") Roll your shoulders back and turn the upper arms out and under to support your chest. Place your hips evenly in the chair. Pause here to deepen and relax your breath, providing time for your body to regulate the flow of blood from your head and chest back toward your feet.
Roll your shoulders back and turn the upper arms out and under to support your chest. Place your hips evenly in the chair. Pause here to deepen and relax your breath, providing time for your body to regulate the flow of blood from your head and chest back toward your feet. on a chair in the Iyengar Yoga method.") Once the pressure in your head has diminished, extend your legs up toward the ceiling. Bring your feet and legs into Tadasana (Mountain Pose).
Once the pressure in your head has diminished, extend your legs up toward the ceiling. Bring your feet and legs into Tadasana (Mountain Pose).- Extend from the back of your knees in two directions, up and down, to create support for your chest to open while lifting your chest toward your chin. Soften your belly and throat.
- When it is time to end, simply slide yourself down off the chair, rest with your hips on the bolster, and your legs in the seat of the chair.
- Stay in this position for another 3-5 minutes to let all of the magic settle in. You may find it is the best moment of relaxation for the day!
Note*: People who have been diagnosed with high blood pressure, even though currently controlled with medication, need to consult with their doctor and a knowledgeable yoga instructor before embarking on the practice of Shoulderstand or other inversions

 Lillah Schwartz, C-IAYT Certified Yoga Therapist, is an Asheville-based yoga teacher, teacher trainer, and author with more than 35 years of experience. A certified yoga therapist, her specialties include her book, Healing Our Backs with Yoga: An Essential Guide to Back Pain Relief, which came out in 2016. Lillah also has three therapeutic yoga DVDs for back pain relief.
